Contents
I. Introduction

Welcome to the world of pizza making, where every ingredient plays a crucial role in creating the perfect slice. Among these ingredients, yeast holds a special place. It is the magic ingredient that makes the dough rise, giving pizza its light and airy texture.
Yeast is a living organism that feeds on sugar and produces carbon dioxide gas as a byproduct. When mixed with flour, water, and a pinch of salt, yeast starts to ferment, releasing bubbles of carbon dioxide. These bubbles get trapped in the dough, causing it to expand and rise.
But yeast does more than just make the dough rise. It also adds flavor and complexity to the pizza crust. As the yeast ferments, it produces various compounds that contribute to the overall taste of the dough. These compounds create a subtle tanginess and a hint of sweetness that enhance the flavor profile of the pizza.
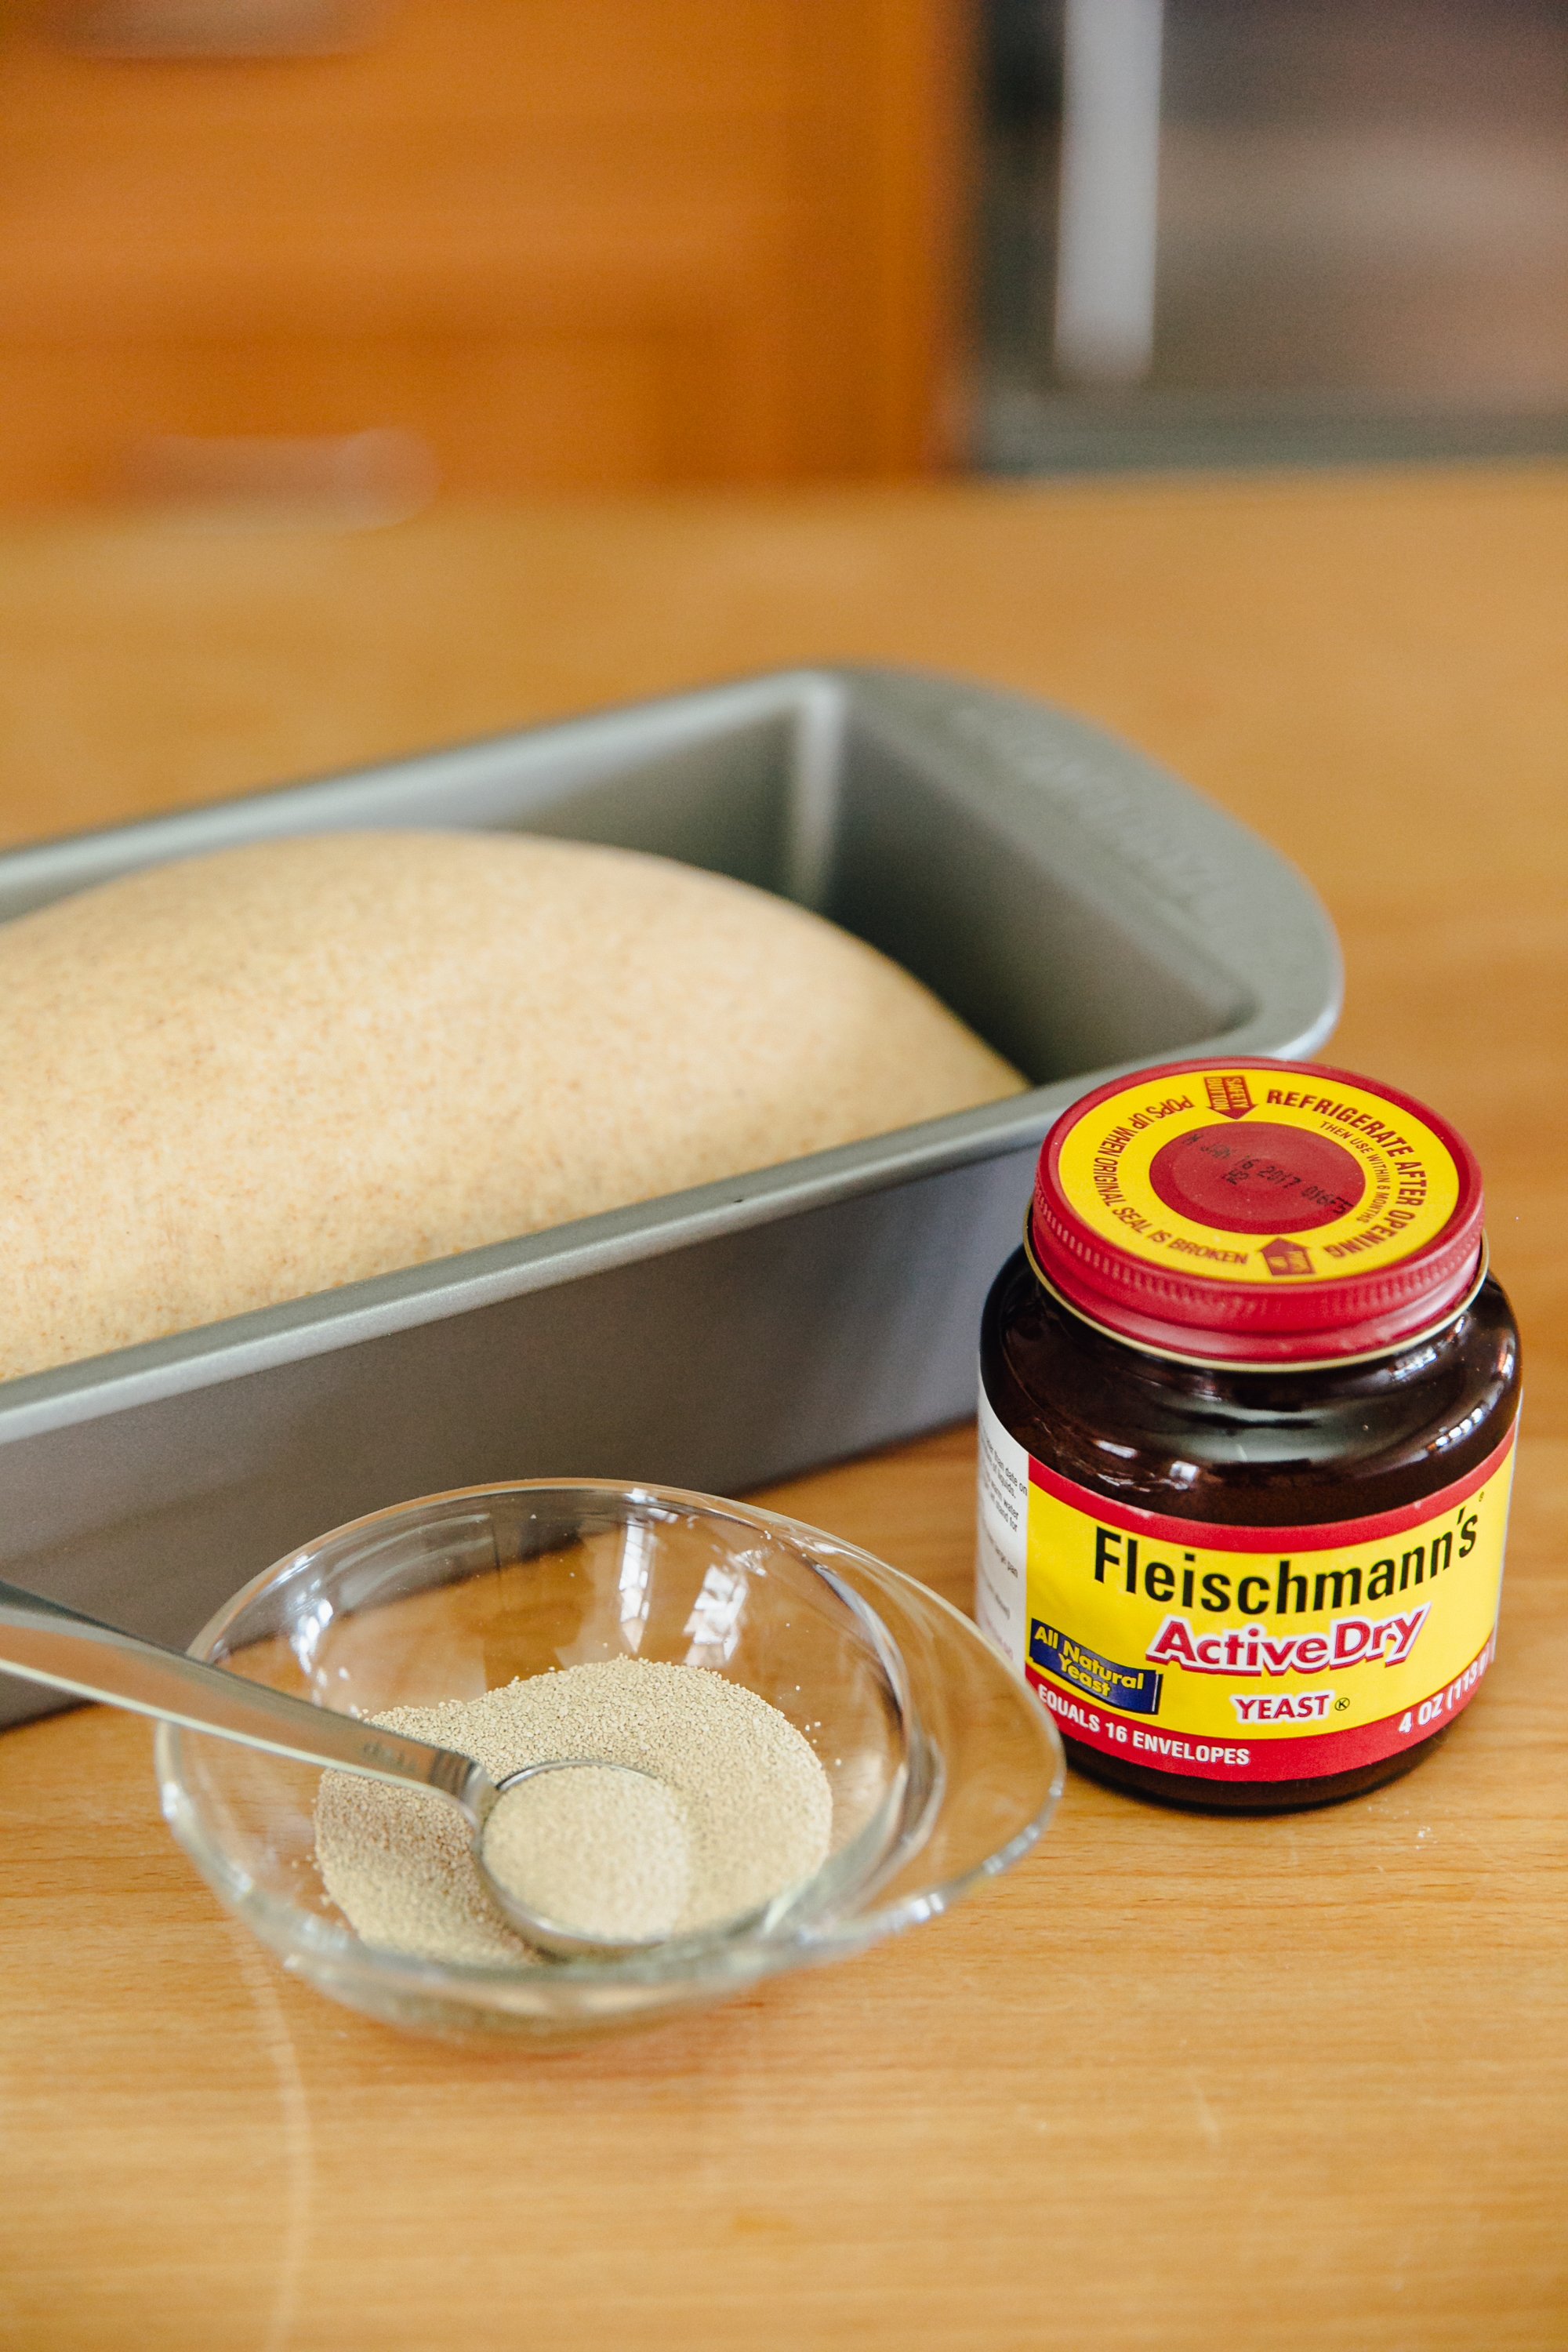
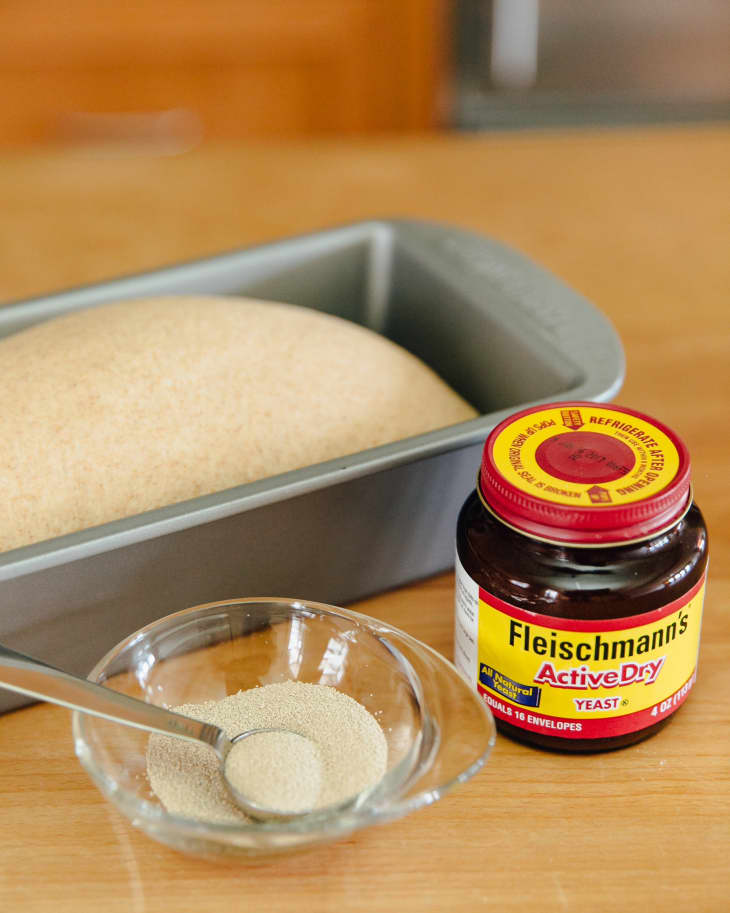
Choosing the right type of yeast is essential for achieving the desired results. There are different types of yeast available, including active dry yeast, instant yeast, and fresh yeast. Each type has its own characteristics and requires specific handling.
In this article, we will explore the fascinating world of yeast and its crucial role in pizza making. We will delve into the different types of yeast, their properties, and the best practices for using them. So, let’s roll up our sleeves and discover the secrets behind the perfect dough!
II. Understanding Yeast
In the world of pizza making, yeast plays a crucial role in creating that perfect dough. Understanding the different types of yeast and their characteristics is essential for achieving the desired texture and flavor in your pizza crust. In this section, we will explore what yeast is and the various types of yeast commonly used in pizza making.
A. What is yeast?
Yeast is a microorganism that belongs to the fungus kingdom. It is a single-celled organism that feeds on sugars and produces carbon dioxide gas and alcohol through a process called fermentation. This gas production is what makes dough rise and gives it a light and airy texture.
Yeast is naturally present in the environment, and it has been used for thousands of years in baking and brewing. It is available in different forms, including active dry yeast, instant yeast, and fresh yeast.
B. Types of yeast used in pizza making
1. Active dry yeast:
Active dry yeast is the most commonly used form of yeast in pizza making. It is made by drying yeast cells and coating them with a protective layer. This type of yeast needs to be rehydrated in warm water before use to activate its fermentation properties. Active dry yeast has a longer shelf life compared to fresh yeast and can be stored at room temperature.
2. Instant yeast:
Instant yeast, also known as rapid-rise yeast or bread machine yeast, is a type of yeast that does not require rehydration. It can be directly added to the dry ingredients in a recipe. Instant yeast has smaller particles compared to active dry yeast, which allows it to dissolve and activate quickly. This type of yeast is convenient and saves time in the pizza-making process.
3. Fresh yeast:
Fresh yeast, also known as cake yeast or compressed yeast, is a moist and perishable form of yeast. It has a higher water content compared to other types of yeast. Fresh yeast needs to be crumbled or dissolved in warm water before use. It provides a strong and distinct flavor to the dough. Fresh yeast is often preferred by professional bakers for its reliable and consistent performance.
Each type of yeast has its own unique characteristics, and the choice of yeast depends on personal preference, recipe requirements, and the desired outcome. Experimenting with different types of yeast can help you discover the perfect combination for your pizza dough.
III. The Science Behind Dough Rising
When it comes to making the perfect pizza, dough rising plays a crucial role in achieving that light and airy crust we all love. Understanding the science behind dough rising can help you master the art of pizza making. In this section, we will explore the yeast fermentation process and the factors that affect yeast activity, including temperature, moisture, and pH levels.
A. Yeast Fermentation Process
Yeast is a living organism that feeds on sugar and produces carbon dioxide gas and alcohol through a process called fermentation. This process is what makes the dough rise and gives it its characteristic texture and flavor.
When yeast is added to the dough, it starts to consume the sugars present in the flour. As it feeds on the sugars, it releases carbon dioxide gas as a byproduct. The gas gets trapped in the dough, causing it to expand and rise. This fermentation process typically takes place over several hours, allowing the dough to develop its flavor and texture.
It’s important to note that yeast requires the right conditions to thrive and produce optimal fermentation. Factors such as temperature, moisture, and pH levels can significantly impact yeast activity and the quality of the dough.
B. Factors Affecting Yeast Activity
1. Temperature:
The temperature at which the dough is fermented plays a critical role in yeast activity. Yeast is most active within a specific temperature range, typically between 75°F and 85°F (24°C and 29°C). At lower temperatures, yeast activity slows down, while higher temperatures can kill the yeast. It’s important to find the right balance and maintain a consistent temperature throughout the fermentation process.
2. Moisture:
Moisture content in the dough also affects yeast activity. Yeast needs a certain level of moisture to function properly. Too little moisture can inhibit yeast growth, resulting in a dense and dry dough. On the other hand, excess moisture can make the dough too sticky and difficult to work with. Finding the right hydration level is crucial for achieving the desired texture and consistency.
3. pH Levels:
The pH levels of the dough can influence yeast activity as well. Yeast thrives in a slightly acidic environment, with a pH range of around 5 to 6.5. If the pH is too high or too low, it can hinder yeast growth and fermentation. It’s important to ensure the dough’s pH is within the optimal range to promote yeast activity and achieve the desired rise.
By understanding the yeast fermentation process and the factors that affect yeast activity, you can take control of the dough rising process and create the perfect pizza crust. Experimenting with different temperatures, moisture levels, and pH adjustments can help you fine-tune your dough recipe and achieve the desired results.
IV. Choosing the Right Yeast for Pizza Dough

When it comes to making the perfect pizza dough, choosing the right yeast is crucial. The type of yeast you use can greatly impact the taste, texture, and overall quality of your pizza crust. In this section, we will explore the factors to consider when selecting yeast for your pizza dough, including the type of pizza crust desired, the time available for dough rising, and personal preference.
A. Factors to consider when selecting yeast
1. Type of pizza crust desired:
One of the first factors to consider when choosing yeast for your pizza dough is the type of crust you want to achieve. Different types of yeast produce different results, so it’s important to match the yeast to the desired crust. For a thin and crispy crust, you may want to use instant yeast or active dry yeast. These types of yeast have a higher rise and produce a lighter texture. On the other hand, if you prefer a thicker and chewier crust, you might opt for fresh yeast or a slow-rise yeast like sourdough starter. These yeasts have a longer fermentation process, resulting in a denser and more flavorful crust.
2. Time available for dough rising:
Another important factor to consider is the time you have available for the dough to rise. Some yeasts require longer rising times, while others work more quickly. If you’re short on time and need your dough to rise faster, you may want to choose instant yeast or a rapid-rise yeast. These yeasts have a higher activity level and can help speed up the fermentation process. On the other hand, if you have more time to spare and want to develop more complex flavors in your dough, you can opt for a slower-rise yeast like fresh yeast or sourdough starter.
3. Personal preference:
Lastly, your personal preference plays a significant role in selecting the right yeast for your pizza dough. Some people have a preference for the flavor and texture that certain yeasts impart on the crust. For example, fresh yeast is known for its slightly sweet and tangy flavor, while sourdough starter adds a distinct sourdough taste. Experimenting with different yeasts can help you discover your preferred flavor profile and create a pizza crust that suits your taste.
Ultimately, choosing the right yeast for your pizza dough requires considering the type of crust you desire, the time you have available for rising, and your personal preference. By carefully selecting the yeast that aligns with these factors, you can create a delicious and perfectly textured pizza crust that will impress your family and friends.
V. Properly Activating Yeast
When it comes to making the perfect pizza dough, properly activating the yeast is a crucial step. Yeast is a living organism that needs to be activated in order to produce the carbon dioxide gas that makes the dough rise. In this section, I will guide you through the steps to activate yeast effectively.
A. Proofing Yeast
The first step in activating yeast is to proof it. This process involves mixing the yeast with warm water and a small amount of sugar to ensure that the yeast is active and alive. To proof the yeast, follow these steps:
- Dissolve the yeast in warm water: In a small bowl, dissolve the yeast in warm water. The water should be around 110°F (43°C), which is the optimal temperature for yeast activation.
- Add a pinch of sugar: Once the yeast is dissolved, add a pinch of sugar to the mixture. The sugar acts as food for the yeast and helps to activate it.
- Let it sit for 5-10 minutes: Allow the yeast mixture to sit undisturbed for 5-10 minutes. During this time, the yeast will start to bubble and foam, indicating that it is active and ready to be used.
By proofing the yeast, you can ensure that it is alive and active before adding it to your pizza dough. This step is essential for achieving a light and fluffy crust.
B. Mixing Yeast with Warm Water
Once the yeast is proofed, the next step is to mix it with warm water. This step helps to activate the yeast further and allows it to start fermenting. Here’s how to mix the yeast with warm water:
- Measure the warm water: Start by measuring the required amount of warm water for your pizza dough recipe. The water should be warm to the touch but not hot.
- Add the proofed yeast: Once you have measured the water, add the proofed yeast mixture to it. Stir gently to combine the yeast with the water.
Mixing the yeast with warm water creates an ideal environment for the yeast to thrive. The warm water provides the yeast with the necessary temperature to ferment and produce carbon dioxide gas, which will make the dough rise.
C. Adding Sugar to Activate Yeast
In addition to warm water, adding sugar to the yeast mixture can help activate the yeast and promote fermentation. Sugar acts as a food source for the yeast, providing it with the energy it needs to grow and multiply. Here’s how to add sugar to activate yeast:
- Measure the sugar: Measure the required amount of sugar according to your pizza dough recipe. The amount of sugar needed may vary depending on the recipe.
- Add sugar to the yeast mixture: Once the sugar is measured, add it to the yeast mixture. Stir gently to ensure that the sugar is fully dissolved.
Adding sugar to the yeast mixture not only activates the yeast but also enhances the flavor of the dough. The yeast will feed on the sugar and produce carbon dioxide gas, resulting in a light and airy crust.
Properly activating yeast is essential for achieving a perfect pizza dough. By following these steps and ensuring that the yeast is alive and active, you can create a delicious homemade pizza with a light and fluffy crust.
VI. Mixing and Kneading the Dough
In the world of pizza making, proper mixing and kneading of the dough are crucial steps that can make or break the final product. These processes help develop the gluten in the dough, which gives it the desired texture and structure. In this section, we will explore the importance of proper mixing and kneading and discuss various techniques that can be used.
A. Importance of proper mixing and kneading
Proper mixing and kneading of the dough are essential for several reasons. Firstly, they ensure that all the ingredients are evenly distributed throughout the dough. This is important because it ensures that every bite of the pizza has a consistent flavor and texture. Secondly, mixing and kneading help activate the gluten in the dough. Gluten is a protein that gives the dough its elasticity and allows it to rise. Without proper mixing and kneading, the gluten strands may not develop fully, resulting in a dense and chewy crust.
Additionally, mixing and kneading help incorporate air into the dough. This is important because it creates small pockets of air in the dough, which expand during baking and give the crust a light and airy texture. Without proper mixing and kneading, the dough may be dense and lacking in these air pockets.
B. Techniques for mixing and kneading dough
There are several techniques that can be used for mixing and kneading dough. The choice of technique depends on personal preference and the equipment available. Here are three commonly used techniques:
- 1. Hand kneading: Hand kneading is the most traditional method and requires no special equipment. To hand knead the dough, start by combining all the ingredients in a large mixing bowl. Use your hands to mix the ingredients together until a rough dough forms. Then, transfer the dough to a clean, floured surface and knead it by pushing it away from you with the heel of your hand, folding it back towards you, and rotating it a quarter turn. Continue kneading for about 10 minutes or until the dough becomes smooth and elastic.
- 2. Stand mixer: A stand mixer can be a convenient tool for mixing and kneading dough, especially for larger batches. To use a stand mixer, attach the dough hook and add all the ingredients to the mixing bowl. Start the mixer on low speed and gradually increase it to medium. Let the mixer knead the dough for about 5-7 minutes or until it becomes smooth and elastic. Keep an eye on the dough as it kneads to ensure that it doesn’t become overworked.
- 3. Food processor: A food processor can be a quick and efficient tool for mixing and kneading dough, especially for small batches. To use a food processor, add all the ingredients to the processor bowl fitted with the dough blade. Pulse the processor a few times to combine the ingredients, then let it run continuously for about 1-2 minutes or until the dough comes together and forms a ball. Be careful not to overprocess the dough, as it can become tough.
Regardless of the technique used, it is important to note that the dough should be kneaded until it reaches the desired consistency. This can vary depending on the recipe and personal preference. The dough should be smooth, elastic, and slightly tacky to the touch.
VII. Allowing the Dough to Rise
When it comes to making pizza, one of the most crucial steps in the process is allowing the dough to rise. This stage is essential for achieving a light and airy crust that is full of flavor. In this section, we will explore the importance of dough rising, the time required for optimal results, and some tips to ensure your dough rises perfectly every time.
A. Importance of Dough Rising
The process of allowing the dough to rise is vital for several reasons. Firstly, it allows the yeast to ferment and produce carbon dioxide gas, which creates air bubbles in the dough. These air bubbles are what give the crust its light and fluffy texture. Additionally, the rising process enhances the flavor of the dough by allowing the yeast to break down complex sugars into simpler, more flavorful compounds.
Furthermore, dough rising also improves the gluten structure in the dough. Gluten is a protein that gives the dough its elasticity and helps it hold its shape. During the rising process, the gluten strands relax and stretch, resulting in a more tender and chewy crust.
B. Time Required for Dough Rising
The time required for dough rising can vary depending on several factors, including the temperature of the environment and the amount of yeast used. In general, the dough should be left to rise until it has doubled in size. This usually takes around 1 to 2 hours, but it can be longer or shorter depending on the specific recipe and conditions.
It is important to note that rising times can be affected by the temperature of the room. Warmer temperatures will speed up the rising process, while cooler temperatures will slow it down. If you are in a hurry, you can place the dough in a slightly warmer environment, such as near a warm oven or on top of a radiator. On the other hand, if you have more time, you can let the dough rise at a cooler temperature to develop more complex flavors.
C. Tips for Optimal Dough Rising
- Warm and draft-free environment: Yeast is sensitive to temperature, so it is important to provide a warm and draft-free environment for the dough to rise. A temperature between 75°F and 85°F (24°C and 29°C) is ideal for yeast activity. You can achieve this by placing the dough in a turned-off oven with the light on, covering it with a clean kitchen towel, or using a proofing box.
- Covering the dough: To prevent the dough from drying out and forming a crust during the rising process, it is crucial to cover it. You can use a damp kitchen towel or plastic wrap to cover the bowl or container. This will create a humid environment that helps the dough rise evenly.
By following these tips, you can ensure that your dough rises perfectly every time, resulting in a delicious and professional-quality pizza crust.
VIII. Punching Down and Shaping the Dough
When it comes to making pizza dough, the process of punching down and shaping the dough is a crucial step that helps to develop the gluten and create the desired texture and structure. In this section, we will explore the purpose of punching down the dough and the techniques involved in shaping it.
A. Purpose of Punching Down the Dough
The main purpose of punching down the dough is to release the built-up carbon dioxide gas that is produced by the yeast during the fermentation process. As the dough rises, the yeast produces carbon dioxide, which gets trapped in the gluten network. If this gas is not released, it can lead to an overly airy and uneven texture in the final baked pizza crust.
Punching down the dough also helps to redistribute the yeast and other ingredients, ensuring a more consistent flavor and texture throughout the dough. It helps to remove any large air bubbles that may have formed during the rising process, resulting in a more even and uniform dough.
B. Techniques for Punching Down and Shaping Dough
1. Folding and Pressing
One technique for punching down the dough is to gently fold it over onto itself and then press it down with the palms of your hands. Start by lightly flouring your work surface to prevent the dough from sticking. Then, using a bench scraper or your hands, gently lift one side of the dough and fold it over towards the center. Repeat this process with the other sides of the dough, folding it like an envelope. Finally, use the palms of your hands to press down on the dough, releasing the trapped gas.
After punching down the dough, it can be shaped into a ball by tucking the edges underneath and rotating it in a circular motion on the work surface. This helps to create tension on the surface of the dough, which is important for achieving a well-shaped and evenly risen pizza crust.
2. Rolling and Stretching
Another technique for shaping the dough is to use a rolling pin or your hands to roll it out into a desired shape and thickness. Start by lightly flouring your work surface and the dough to prevent sticking. Then, using a rolling pin, gently roll the dough from the center outwards, rotating it as you go to maintain an even thickness.
If you prefer a thinner crust, you can continue rolling the dough until it reaches the desired thickness. For a thicker crust, you can leave the dough slightly thicker and adjust the baking time accordingly.
Alternatively, you can use your hands to stretch the dough into the desired shape. Begin by gently pressing down on the center of the dough with your fingertips, leaving a border around the edges. Then, using your hands, gently stretch the dough from the center towards the edges, rotating it as you go to maintain an even thickness.
Once the dough is shaped, it can be transferred to a pizza peel or baking sheet for topping and baking.
IX. Proofing the Dough
Proofing is an essential step in the pizza-making process that involves allowing the dough to rise before baking. This crucial step allows the yeast to ferment and produce carbon dioxide, resulting in a light and airy crust. In this section, we will explore the definition of proofing, the importance of proofing pizza dough, the duration and temperature for proofing, and tips for successful proofing.
A. Definition of Proofing
Proofing, also known as fermentation, is the process of allowing the dough to rise after it has been mixed. During this time, the yeast in the dough consumes the sugars and releases carbon dioxide gas, causing the dough to expand. This process gives the dough its characteristic texture and flavor.
Proofing can take place at room temperature or in a controlled environment, such as a proofing box or a refrigerator. The duration of proofing depends on various factors, including the recipe, the ambient temperature, and the desired flavor and texture of the crust.
B. Importance of Proofing Pizza Dough
Proofing pizza dough is crucial for several reasons. Firstly, it allows the yeast to activate and ferment, which enhances the flavor of the crust. The longer the dough is proofed, the more complex and developed the flavors become. This is especially important for artisanal or sourdough pizzas, where the flavor profile is a key component of the final product.
Secondly, proofing gives the dough its desired texture. The carbon dioxide produced during fermentation creates air pockets in the dough, resulting in a light and airy crust. Without proper proofing, the crust may be dense and lacking in volume.
Lastly, proofing also improves the digestibility of the dough. The fermentation process breaks down complex carbohydrates, making them easier to digest. This can be particularly beneficial for individuals with gluten sensitivities or digestive issues.
C. Duration and Temperature for Proofing
The duration and temperature for proofing pizza dough can vary depending on the recipe and the desired outcome. Generally, proofing can take anywhere from a few hours to several days. The longer the proofing time, the more pronounced the flavors and textures will be.
For room temperature proofing, the dough is typically left to rise at around 70°F to 75°F (21°C to 24°C). This temperature range allows the yeast to ferment at a moderate pace, resulting in a well-developed flavor and texture. However, it’s important to note that proofing times may need to be adjusted based on the specific recipe and ambient conditions.
In some cases, refrigerated proofing can be used to slow down the fermentation process. This method is often employed in professional pizzerias or when planning ahead for a future bake. The dough is placed in the refrigerator, where the lower temperature slows down the yeast activity. This extended proofing time can result in a more complex flavor profile and improved texture.
D. Tips for Successful Proofing
To ensure successful proofing of pizza dough, here are some tips to keep in mind:
- Use high-quality ingredients: Start with fresh yeast, good-quality flour, and filtered water. The quality of the ingredients will directly impact the flavor and texture of the final product.
- Follow the recipe: Pay close attention to the proofing instructions provided in the recipe. Different dough recipes may require different proofing times and temperatures.
- Allow for proper resting time: After kneading the dough, give it some time to rest before shaping and proofing. This allows the gluten to relax and makes the dough easier to work with.
- Monitor the dough: Keep an eye on the dough during the proofing process. It should roughly double in size and have a slightly domed appearance. Overproofing can lead to a collapsed crust, while underproofing may result in a dense and chewy texture.
- Experiment with different proofing times: Try proofing the dough for different durations to find the flavor and texture that you prefer. Keep a record of your experiments to replicate successful results in the future.
By following these tips, you can achieve perfectly proofed pizza dough that results in a delicious and satisfying crust.
**X. Baking the Pizza**
**A. Preheating the oven**
To bake a delicious pizza, it is crucial to preheat the oven properly. Preheating the oven ensures that the pizza cooks evenly and achieves the desired crust texture. To begin, set the oven temperature to the recommended level specified in your pizza recipe. This is typically around 450°F (232°C) for a traditional pizza.
Allow the oven to preheat for at least 15-20 minutes to ensure that it reaches the desired temperature. Preheating the oven adequately ensures that the pizza cooks evenly and prevents any undercooked or soggy areas. It also helps to create a crispy crust, which is a hallmark of a well-baked pizza.
**B. Choosing the right baking surface**
The choice of baking surface can greatly impact the final result of your pizza. There are various options available, each offering a unique texture and flavor profile.
One popular choice is a pizza stone. A pizza stone absorbs moisture from the dough, resulting in a crispy crust. To use a pizza stone, place it in the oven during the preheating process to allow it to heat up. Once the oven is preheated, carefully transfer the pizza onto the hot stone using a pizza peel or a flat baking sheet. The stone will help distribute heat evenly, resulting in a perfectly baked pizza.
Another option is a baking sheet or a pizza pan. These surfaces are typically made of metal and provide a different texture to the crust. To use a baking sheet or a pizza pan, simply place the pizza directly on the surface and slide it into the preheated oven. These surfaces are great for achieving a golden and slightly crispy crust.
**C. Tips for achieving a crispy crust**
A crispy crust is often the highlight of a well-baked pizza. Here are some tips to help you achieve that perfect crunch:
1. Use a pizza peel or a flat baking sheet to transfer the pizza onto the baking surface. This ensures that the dough maintains its shape and doesn’t lose any air bubbles.
2. Dust the baking surface with cornmeal or flour before placing the pizza on it. This prevents the dough from sticking and helps create a crispy bottom.
3. Avoid overloading the pizza with toppings. Too many toppings can weigh down the dough and prevent it from becoming crispy. Stick to a moderate amount of toppings to allow the crust to crisp up.
4. Consider par-baking the crust before adding the toppings. Par-baking involves partially baking the dough before adding the sauce and toppings. This helps create a sturdier crust that can withstand the weight of the toppings without becoming soggy.
5. Brush the crust with olive oil or melted butter before baking. This adds flavor and helps create a beautiful golden crust.
**D. Baking time and temperature**
The baking time and temperature can vary depending on the type of pizza and the thickness of the crust. However, there are some general guidelines to follow:
1. For a traditional pizza with a thin crust, bake at a high temperature of around 450°F (232°C) for 10-15 minutes. Keep a close eye on the pizza to prevent it from burning.
2. For a deep-dish or thick-crust pizza, lower the temperature to around 375°F (190°C) and bake for a longer time, usually around 20-25 minutes. This allows the thicker dough to cook through without burning the top.
3. If using a pizza stone, preheat it in the oven for at least 30 minutes before baking the pizza. This ensures that the stone is hot enough to create a crispy crust.
4. Rotate the pizza halfway through the baking process to ensure even cooking. This helps prevent any hot spots in the oven from causing uneven browning.
In conclusion, baking the perfect pizza requires attention to detail and the right techniques. Preheating the oven, choosing the right baking surface, following tips for a crispy crust, and adjusting the baking time and temperature are all crucial steps in achieving a delicious homemade pizza. Experiment with different methods and ingredients to find your own signature pizza recipe. Enjoy the process and savor the mouthwatering results!